Pinterest

Follow Me on Pinterest

Sunday, March 4, 2012

Craft A Week #19 Lost Sock Area

Like other  people, I have an issue with lost socks in the laundry. Most every time I do wash, I end up with a lone sock or two. The mate usually turns up but that's only good if I can locate the first sock (which I usually cannot). I have a bin in the laundry room that I toss random socks, but it's just not an efficient system. I end up with a big pile of socks that I need to sort through.

I got this idea from a pin on Pinterest but, of course, I changed it.  The original post looked like the wording was painted on the wall, which was just too much work for me. My way was much more simple.


I'm not sure what the original wording was but I like my version better. I had some cloud paper and a 5" x 7" frame. All I did was print this off and I was good to go.


I had clothesline cord and clothespins left over from my son's baby shower last week. I just hammered in a few nails and hung the cord.  See, I told you it was simple.


Now the single socks can be hung up and will be so much easier to pair up with their mate.  Since it's just me, I didn't need to use a whole lot of cord. I'm making one for my daughter that will be longer (or maybe do several layers).

Craft A Week #18: Crocheted Lalaloopsy Doll Modified

This weekend marks the start of Spring Break. Having a week off from work in mid-March is definately one of the perks of teaching. While I am looking forward to relaxing and catching up on some work, I'm also looking forward to crafting. I've had a good and productive two days but before I post the new things I've done, I want to post something I created awhile ago and never posted.

Way back when, in Craft A Week #2, I made a few crocheted Lalaloopsy dolls.  While they came out cute, I was not a fan of their extremely oversized heads. They looked too far out of proportion for my tastes. So me being me, I modified the pattern to be something that I liked much better.  Here she is:

She still has a skinny body but her head is not so huge and wobbly.

 Isn't she cute?!

My favorite part of her is her hair. It's spiral curls and I used this cool vintage yarn that is fuzzy (I think it has some wool in it).


 Here she is with a spring flower. She has set up camp on my fireplace hearth for the time being. Don't you love her?!

I feel like I need to make at least another one before I post my instructions. I did jot them down while I was making her but I want to make certain they are correct before handing off to someone else. I've moved on to other things but, hopefully, I'll get back to this in another month or so.

Happy Crafting!

Thursday, March 1, 2012

Dr. Seuss Words To Live By

I love Dr. Seuss. His messages are so clear and full of wisdom but delivered in a way that is not preachy.  I found this on Pinterest and just had to share here.
Dr. Seuss Quotes
[Via: 30 Dr. Seuss Quotes to Live By]

Not sure what this was originally (a poster? bookmark?)  In any case, it's wonderful. Words to live by!

Monday, February 27, 2012

Craft A Week #17 Crocheted Easter Bunny

In my quest to actually do things I find on Pinterest, yesterday I made this cute little crocheted bunny. I had this soft, fuzzy, vintage white yarn and it seemed perfect for bunny. 


Isn't she cute?


 I like her pink nose and cheeks.


Because I used the vintage yarn, she will be an Easter decoration (as opposed to a kid's toy).

The instructions can be found here:  Sweetheart Bunny.  The instructions are pretty straightforward, however, I used a different size hook because my yarn was textured.

Happy Crafting!

Craft A Week #16 Chalkboard Coffee Cans

I must have a dozen plastic coffee cans around my house from my pre-Keurig days.

Being the avid saver that I am, I always figure there is something that I can/will do with them.  They make great storage containers but they really aren't very pretty (sorry Folgers).  So I decided to upcycle them by painting with chalkboard paint. 


I had this chalkboard paint on hand but you can also find instructions on how to make your own on Pinterest.  The label instructions say to paint at least two coats, letting dry an hour between. I did three but if I had to do again, I'd do at least four coats and I would scuff it up with sandpaper before the first coat. I'm thinking this will give the paint something to hold onto (rather than the slick surface of the plastic).


After you put on the desired number of paint coats, let it dry for 24 hours. After that, cover the entire surface with chalk to cure it.  You can wipe if right off and now it is ready for use.


Super simple!  I really wanted/needed a compost bin but I think these would be great for all kinds of kids toys and art supplies. I actually have a bunch of these coffee cans (unpainted) that I use to store the grandkids toys (crayons, army men, Polly Pockets). These will look much nicer on the shelf than the unpainted red ones. And the kids can decorate. Art and organization! Who could ask for more?!

Thursday, February 23, 2012

Craft A Week #15 Crocheted Stones

Yes, it has been awhile since I've posted (thanks for reminding me Ariel). I haven't been crafting too much lately because of work responsibilities (and Pinterest). I have actually made several things that came from Pinning but none that were really postworthy.

That is until making these crocheted stone covers. I know it sounds strange but they look pretty cool. (The grandkids called them sweaters for rocks). Whatever you call them, I love the juxtaposition of the thread against the stones. They are pretty and different. And super easy and quick to make.


Aren't they pretty? I have them in a tray on the counter but I think singularly they would make a nice gift (as paper weight?). 

I got the idea from this site (Purlbee.com) but I didn't really follow her instructions. If you know how to crochet, all you need to do is start with a ring and go from there. That was the real fun part of this project; the randomness of creation. I just started crocheting and then found the rock that fit best. As I said, super simple.

I will try to be more diligent in posting. It's hard to call posts "Craft a Week" when I don't post weekly!  If you sign up as a follower or via email, you will automatically get an email when I publish a new post. 

Happy Crafting!


Monday, February 13, 2012

Craft A Week #14: Pelier Bead Bowl

Another super simple kid craft!  Take Pelier beads (those little plastic beads that are used to melt onto a plastic frame) and melt in the oven to make a bowl.  Really, it's that simple. Here's more details:

1. Heat oven to 400 degrees.
2. Oil an oven safe bowl.
3. Dump a handful of Pelier beads in the bowl. Push them into the bowl so they are single layer and go up the sides of the bowl. Make sure you have large gaps filled.
4. Put the bowl on a cookie sheet and heat for 10 minutes.
5. Keep an eye on this so they don't burn. Once the beads start to spread and the center hole gets large, they are done.
6. Allow to cool (about 10 minutes).
7. Slide the melted plastic bowl out.
8. Wash the oil off the bowl with a little dishwash soap. Just do so carefully.

(See, told you it was super simple).  Here's what they looked like shortly after removing from oven:


See how they've expanded (melted)?

Here's the final product (after letting it cool and then sliding out of the bowl):


I don't think they were that spectacular but the kids liked them. They seem sturdy enough for things like change, keys, jewelry, etc. I just don't think they'd withstand alot of handling.  If I do again, I think I'd find a slightly smaller bowl to put inside the first one so the beads can be stacked up higher and have a more finished look.

Happy Crafting!

Sunday, February 12, 2012

Craft A Week #13: Finger Knitting

When I saw this craft on Pinterest, I knew I had to try it with my grandkids, particularly A.J. (age 9). A.J. is really interested in my crochet work and I "taught" him how to a few months ago.  (Not so much taught because he couldn't really do it himself; more like I sat with him and half did it for him. Being a big boy of 9 AND a perfectionist, this really didn't work for him.

I'm not sure how I never heard of hand knitting before. It's sort of like weaving (over/under) and really simple.  Here's A.J. in action:


Note that he is knitting so fast that it is all just a blur!

 
So simple. All you do is wrap the yarn around your fingers one way, wrap the opposite way on your way back, then pull first round over the second.  Can you see one of the finished scarves on the couch beside him?


Here his is proudly showing off one of his finished products while working on another.


The complete, step by step instructions can be found here:  Flax and Twine Finger Knitting.  This was a perfect craft for a 9 year old, though it was a little boring and challenging for his sister Kylie (age 8).  Anne Weil (at Flax and Twine) says she's taught much younger kids (age 4 or so) to do this but it seems to me it would have to be a very dexterous kid.  While this craft is super simple, it does take some fine motor skills.

A.J. wanted to make a scarf from his strips so I single crocheted two together to make it thicker and more substantial.  This is a great project for a kid to make as a gift. He learned how to do this last night and within a few hours, he completed two strips (which I sewed into a scarft). He made another for his sister, one for me, and now working on one for his mom.  What a great craft for a kid!

Happy Crafting!

Saturday, February 11, 2012

Homemade Pretzel Bites

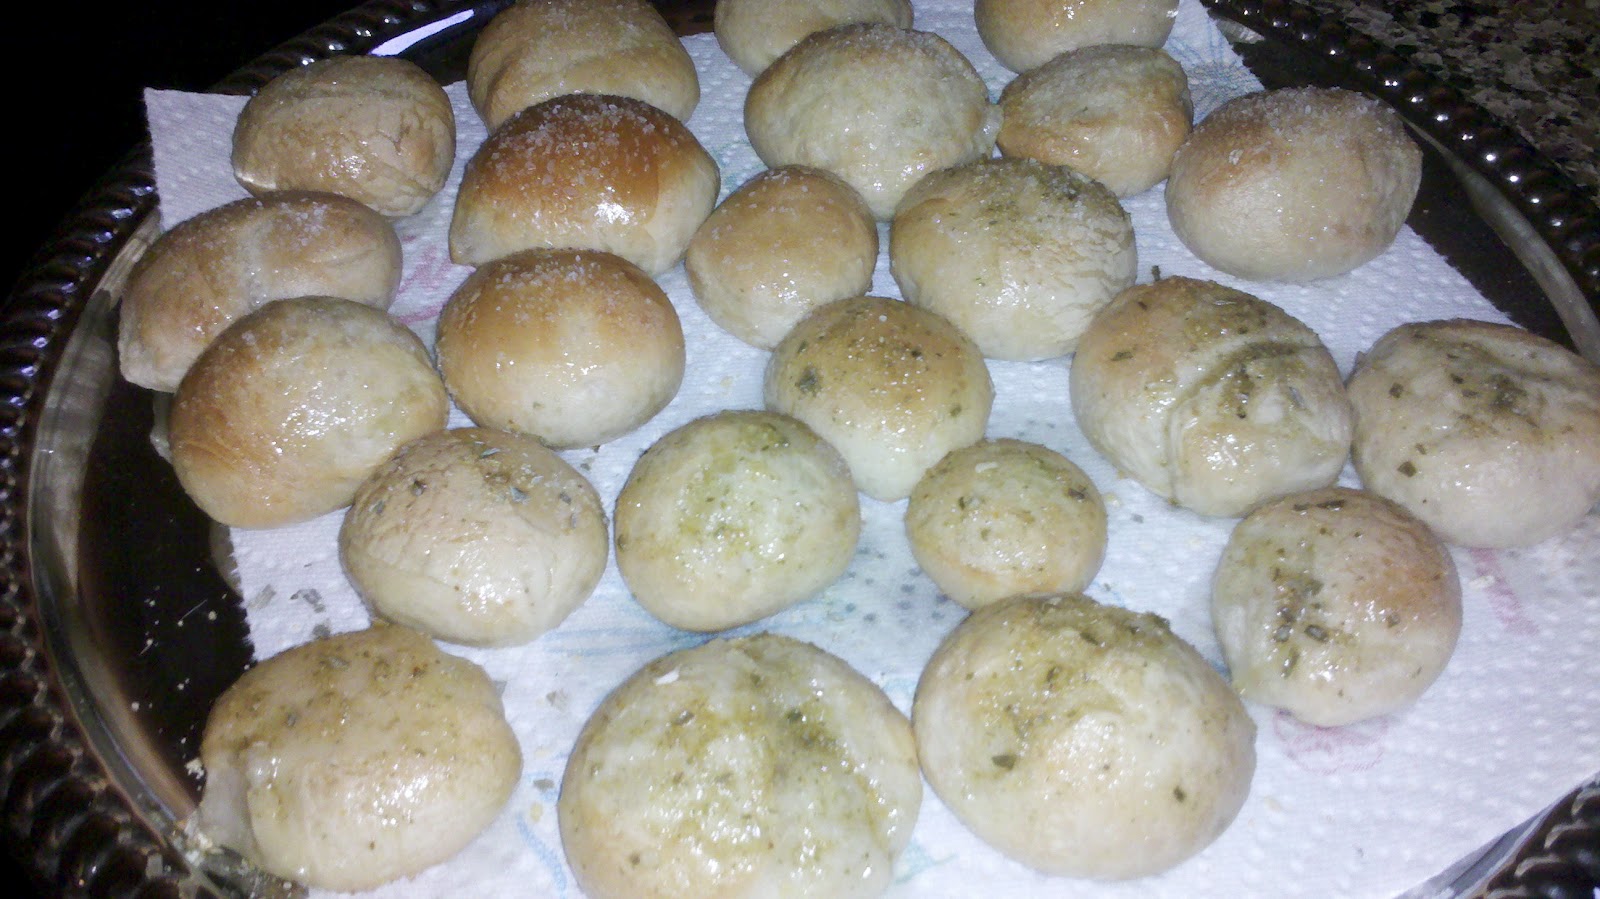
I'm on a mission to actually DO some of the stuff I've been pinning so today I made homemade pretzel bites. It was super easy and they came out so yummy.  The link with all the instructions can be located here:  Just Get Off Your Butt and Bake (Don't you love the name of that blog)?

This link has step by step directions so I won't redo the entire thing. What makes this so easy is that you use frozen bread dough (thawed).  I just put the dough out of the freezer in the a.m. and, within a few hours, it was thawed and good to go.  Here's how mine came out:


The recipe called for using cinnamon sugar OR parmessan cheese.  I didn't have any cinnamon so I used kosher salt for one kind and some herb mix I had in the cupboard for another flavor.


I have several of these flavor things that I just don't use all that often.  This was a very good use for it!  They came out yummy and I recommend this recipe.


Friday, February 10, 2012

Manly Baby Shower Ideas

I haven't posted much in the last few weeks because I've been busy with alot of things....classes, grant reviews, Pinterest, and prepping for my son Zack's baby shower.  We are having a shower for HIM, as this is his first baby (when he married Julie, she had two sweet, wonderful kids).  I thought this would be easy (to throw a man shower) but it's really not so simple.  I searched all over and here's some of my ideas:


1.  Make a banner that says "Welcome Marcus Robert".  I'm going to hang it across the room AND attach some cute bibs, booties, and onesies (Raiders: Dad's favorite team).  You can find the banner letters here:  Alphabet Bunting.  I just printed them out on card stock paper. Super cute and easy.


2.  Print out these "Wishes for Baby" cards.  Each guest will write their wishes for Marcus Robert. Wishes include things like "I hope you learn to...."; "I hope you are not afraid of.....".  They can be found here:  Wishes for Baby.  These can then be gathered up and saved in Marcus' baby book.


3.  I want to make some cute bibs or onesies and hang as more decorations. I found the most adorable images to iron on.  These are some of my favorites:

For Kylie


Or this one. Not sure which I like better.


For AJ


For Breanna (the kids all call her Nana).

Just because it is cute.


4.  We are having a Raiders/sports theme.  I've got black, white, and silver paperware, tableclothes, and streamers. I've got Dollar Store balls (football, soccer ball, basketball) to sit around for decorations. Since last week was SuperBowl, I found a bunch of cute sports food ideas. 

Since this is a man party, the party favors include beers and bags of pretzels. I thought that was super appropriate!

I'll post pictures of the party once things are all decorated. 

Happy Crafting!