Pinterest

Follow Me on Pinterest
Showing posts with label cool. Show all posts

Monday, May 6, 2013

Floor Lamp Planter

The following was created because of an inspiration someone posted on Facebook. (Thanks Debbie)!  A super simple and cute idea that incorporates some of my favorite things: Upcycling and planting.


I had this old floor lamp that I wasn't using anymore. I got the black basket at the Dollar Store and used Gorilla Glue to secure it.  Once that dried, I placed the coco mat inside (cut to fit). I then put some sphagnum moss and dirt in, followed by plants. I used chenille plant and I'm not sure what else the others are called. I chose these plants because I thought the combination will give both height and will droop over the sides as the plants grow.


To top it off, I put this sweet solar motioned piggy that I got from Chinatown L.A.  What a perfect home for him!


Isn't he cute?!
 
Another super simple project.  My recommendation is to not overfill the planter. This will grow all summer so you want to make sure the plants have room to grow. I will update this post later in the summer after it fills out.

Sunday, April 28, 2013

Spring Planting

Hi All!

First, my apologies for not creating any new posts for a very long time. Life (and making a living) got in the way and my craftiness really got put on the back burner.  Now that school is over for the summer, I am hoping to spend a summer crafting and repurposing (and posting).

It is finally springtime here in the Mid Atlantic; I am inspired.  I stumbled upon this adorable head planter at Rite Aide of all places!  Best of all, it was 50% off so it only cost me $10.  Isn't he cute?

I went back today for another one but they were sold out (no suprise there).  So I decided to get creative and make my own.

I looked around the house to see if I could repurpose something.  I found this doll bust that had hair to style. I got this for Jasmine a few years ago and think she played with it once or twice.

While she is sweet, I knew there was a better place for her than being stuck in the cupboard under the bathroom sink.  I figured no one would miss her so I got out the exacto knife and went to work.

This was very easy to do. I started at the back of her head and cut the plastic close to her hair line.  I wanted to keep as much of the plastic head as possible so it would be big enough to hold a plant. The plastic was soft (plastic doll baby soft) so it didn't splinter or break.

Because she is plastic, I started with a primer to make sure and cover the bright pink of her shirt.  I let that dry a bit and the sprayed with Rustolium Rosemary Hammered spray paint. (Now that I'm looking at the can it says it is paint and primer combined so maybe I didn't need the primer afterall.

While the paint didn't adhere like I originally planned (some streaked and ran) I love the way she turned out. It is also about to rain and was pretty windy so that may also have contributed to her mottled look.  That said, I think the imperfections make her look weathered and antique.  I plan to spray her again when the weather is better and will also spray her with a sealant. 

 I just stuck in this chenille plant to see what she will look like with "hair". I think I will put some succulents because they grow slow and are super simple to take care of. 

There's something about her that reminds me of the Bird girl of Savannah.  Something sweet and wistful. 

So now I have yet another thing to keep an eye out for while yard saling! Here's hoping I have a cool collection of them by the end of summer.  And if I plant succulents in them, they will just lay dormant during the winter and come back to life again in the spring.

I hope you like my first post in months. I've got some other projects that I have in mind to work on. Again, thanks for stopping by to visit. 

Happy Crafting!

Thursday, December 8, 2011

Craft a Week #4: Tagxedo Word Picture

Man, I am on a roll this week!  I found this great site that allows you to upload pictures AND words, which then makes the words become the picture. So very cool.  The site is Tagxedo.  The program pretty easy to use and self explanatory. 

I think the greatest challenge is finding the right picture to use. My first one was a picture of Jasmine.  I used this photo:

I used this picture because it was a head shot and I thought it would work best.  First I uploaded the picture.  (Go to "Options" and click on "Shapes". Once there, either use a shape they already provide or upload a picture under the "Add Image" on the bottom right. 

Then I went into Word and typed in as many words as I could think of that made me think of her. I used words like amazing, funny, smart, creative, beautiful, daughter, sister, granddaughter, (her name), etc. When I got stuck I highlighted a word I already used and looked up synonyms.  Once I had a bunch of words, I saved it as a "txt" document so I could upload on the Tagxedo site.  To do this, go to the "Words" tab, and click "Load". Once there, click on the "File Browse" tab and upload your word file there.

And voila! your word picture is created. You may have to play around with some of the settings (under the "Word Layout" tab).  Once done, make sure to save your final document.   Maybe there's a way, but I could only figure out how to save a thumbnail on my computer.  The larger word picture does save on the Tagxedo site but I wanted to be able to save and play with it as a picture on my C drive. 

Here's my final product:

I don't like this Polly Pocket version because you can't see the actual shading of her face that compliments the photo (and really helps define it).  It does print out okay though. I think I'm going to work on these for the grandkids: print, frame, and hang in the spare bedroom. That way when they come to spend the night, they can see how their Gam really feels about them (lots and lots of love). 

You can also chose a shape, link a website, and create a word picture. Here's my RBG Word Picture:


I think this is a very cool site and worth playing with. Who wouldn't love a gift of a word picture that lets people know how much you love them?! And it allows me to do two of my favorite things at once: writing and crafting!

Happy Crafting

Friday, October 21, 2011

Dresser ReDo

You know I love to reuse and repurpose. I found this great idea for redoing an old dresser on "Design Spounge" (one of my favorite sites for design inspiration.  I love how just adding the legs really makes this totally new piece. Amazing!

Before and After Cabinet


Tuesday, September 20, 2011

Random Bits of Goodness Angel Mirror

I was so excited and inspired by the original Random Bits of Goodness Mirror that I made another!  For the past few years I've been collecting religious icons, not really sure what I wanted to do with them. I really wanted to create a picture that had representation of many world religions, but I was very heavy on Christianity (including 4 strings of rosary beads - and I'm not even Catholic). Given that, I decided to make this one with crosses, angels, and other Christian artifacts.  I love it!

I love this little cherub. It's actually ceramic.


I picked up this tiny bible somewhere....I wanted to include it but couldn't "bronze" it. So for now, it's just sitting atop the frame.  I may try to attach it somehow.


Another corner with angels and crosses.


Here's the two frames hanging on my wall. 


Saturday, September 17, 2011

Random Bits of Goodness Mirror

Those who know me understand that I truly enjoy kids, toys, and crafts. I love my grandchildren (and their friends, and my neighbor's kids). Our family has six children between the ages of 3 and 9 (and another sweet little baby joining us in March 2012). 

Five of our six children are within 2 years of each other so they've gone through the same developmental cycles around the same time. That means I've got alot of little plastic toys all over my house! Now that the most of the kids have outgrown them, I was on the lookout for something to do with all the residual playthings. (Obviously, I wasn't about to just toss the stuff out).  I came upon this very cool project!

The good people at the website "Can't Stop Making Things" (don't you love that name?!) gave me a solution. They call it a Faux Metal Mirror. I call it Random Bits of Goodness! I love all the little chachke that comes with little kids. This project gave me a great way to recycle, save and display toys that would otherwise have been thrown away.

It's a proces, so bear with me!

Supplies:

  • Artist Canvas (mine is 16" x 20")
  • Mirror tile (mine is 12" x 12")
  • Lots of discarded plastic toys, or anything in your junk drawer (mine took alot. I knew there was a reason I saved all those KinderEgg toys)!
  • Liquid Nails glue
  • Spray paint for plastic (I bought pink because it was on sale at Ollie's for .99)
  • Primer spray paint (I used rust color)
  • Copper Metal & Patina Glaze by Valspar
  • Antiquing Glaze by Valspar
  • Clear spray

Tools
  • Masking tape
  • Paint brush
  • Clean cloth (to apply the Antiquing Glaze)

Note: "Can's Stop Making Things" said to use Copper Topper but I couldn't find it locally so I substituted the Valspar products.


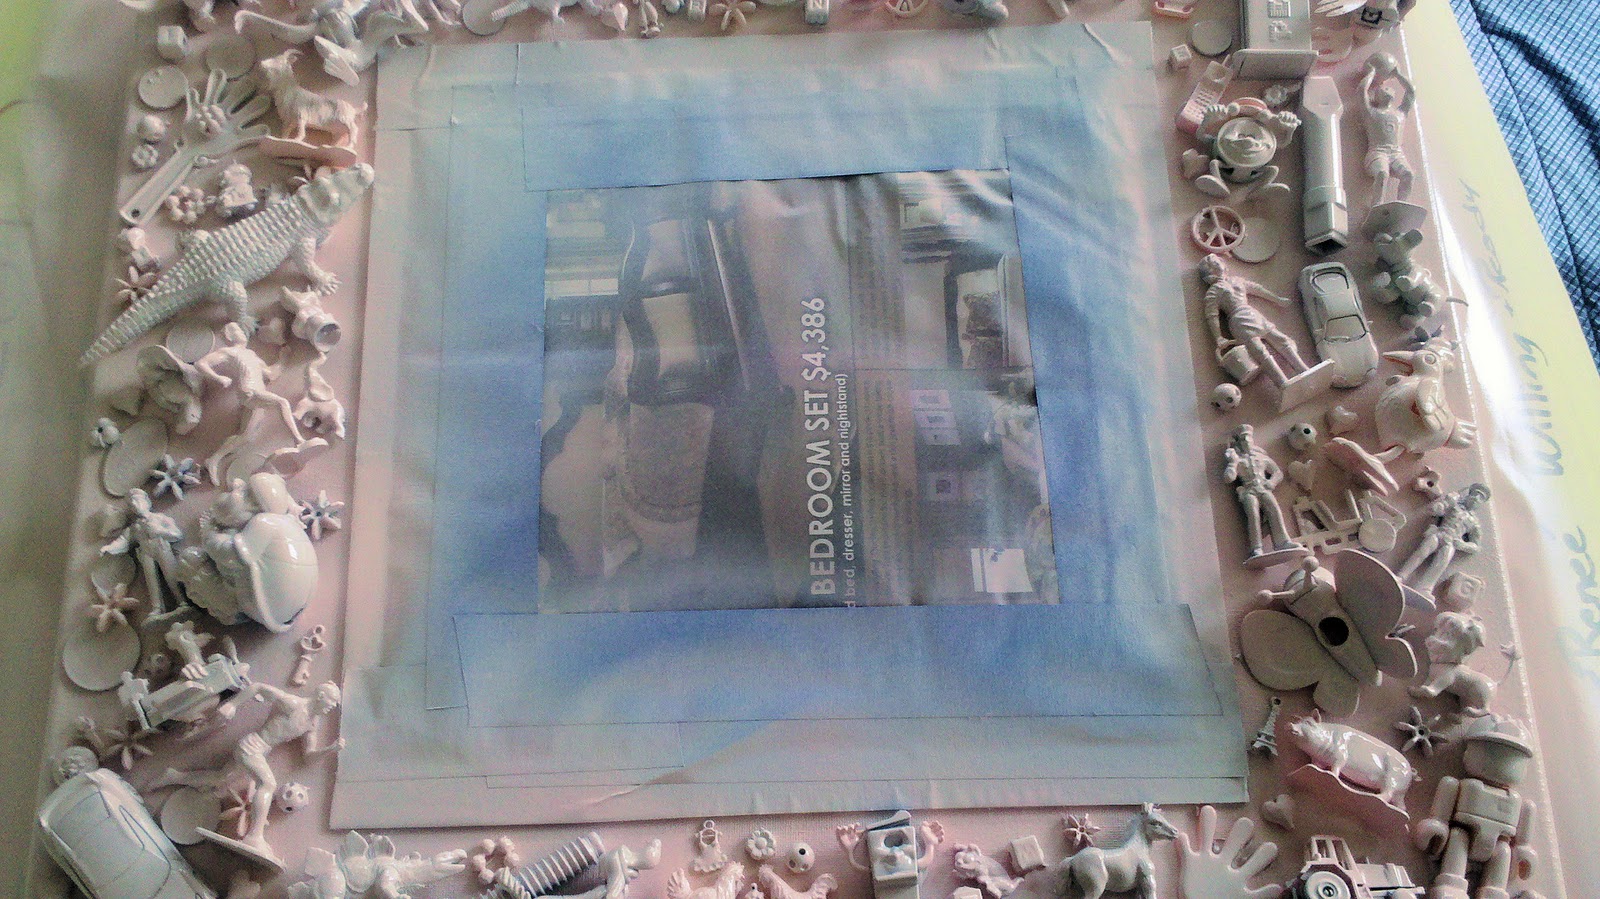
This is what I started with. I centered and glued the mirror onto the canvas.


Glue all the goodies onto the canvas, around the mirror.


Here's a close up. This was a process for me. I put things where I thought I wanted them but let it sit overnight before glueing in place. I'm glad I did because I changed some things. When you are satisfied with your placement, glue them into place.


Tape off the mirror. Spray paint with a paint made for plastic. The color doesn't matter. (Mine was pink). This coat is just so the true base coat will adhere appropriately. Apparently it will stick better if all pieces are covered in the plastic paint. I used several light coats to make sure everything was covered without dripping.


Allow to completely dry. Once that is done, spray with the rust primer.  Again, use light coats but make sure to completely cover all sides of the objects with the paint.


The Valspar product says to allow the base coat to dry at least 4 hours before using. This was a total test of patience for me as I really wanted to see the completed project!


The next step was to apply the copper glaze. I put two coats on, allowing the first coat to dry before applying the second. While the second coat is still wet, I applied the antiqueing glaze. I let it dry overnight and then sprayed with the sealer.


Viola! My completed project!  I absolutely love how it came out! I don't think the pictures really do it justice. I'm still waiting for the sealer to dry and I will take more pictures later. Looks like metal, right?! I was going to hang this in my spare bedroom but I love it so much I think I will hang in the living room.


Since this came out so well, I'm going to make another picture. I'm interested in religious iconography and think I shall do one with crosses and angels. Stay tuned!

Thursday, September 15, 2011

Interactive Art


Candy Chang is an interactive artist who installed some very cool projects in New Orleans. While this installation is large and based in a public area, I can also see it on a much smaller scale (maybe 3' x 4'?) on a wall of the deck. It would be a great conversation starter, as well as a wonderful way to get to know your loved ones better.  Very cool!

Candy Change Interactive Art