Pinterest

Follow Me on Pinterest

Saturday, March 31, 2012

Andes Mint Cookies Recipe

I found this recipe on Pinterest (where else?!) on the Six Sisters Stuff website. This is a great site; it is six sisters who created this blog to share recipes, crafts, and how to's with each other.  I recently gave them the Most Versatile Blogger Award.  Check them out; I think you will like them.

My son Zack has always loved Andes Mints so this recipe was perfect for a treat for him.  This morning, my granddaughter Kylie and I made them as a belated birthday gift for him (with help from brother A.J.).  The recipe is so easy: It only has 4 ingredients. Here's what you need:

1 box of Devil's Food or chocolate cake mix
1/2 cup oil
2 eggs
1 box of Andes Mints

1.  Heat oven to 350. 
2.  Mix together cake mix, oil and eggs.
3.  Drop by teaspoonfuls onto greased cookie sheet. 
4.  Bake 8 minutes (the original recipe said 6-10 but 8 worked best for us).

While the cookies are baking, unwrap all the candies. Make sure you do this or you will be scrambling to do the next step.

5.  As soon as you take the cookies out of the oven, place an Andes Mint in the center of the cookie. Let them sit for a few minutes so the chocolate will melt.
6. Once the candy has melted, spread chocolate over the top of the cookie.
7. Eat them up YUM!


Based on the size of our spoonfuls, this recipe made 36 cookies. We were fortunate that we had another box of Andes Mints because there are only 28 mints per box. We had a second box so we were able to make all the cookies. I suppose you could substitute another chocolate candy, like miniature Snickers or Milky Way.  I would cut those in half though because they would be too much candy for the size of the cookie.

 Here's my sweet granddaughter Kylie who made these cookies with me. They were really simple to make and we had alot of fun. And these cookies are so good!


Broccoli Slaw Salad Recipe

I really like broccoli salad but it always seems like alot of work for me. I know it's really not but it does take some time to clean and cut up the broccoli.  In my quest to work smarter and faster, I created this recipe for broccoli salad.  It is really yummy and quick to throw together.


1 bag of broccoli slaw
1/2 cup Sweet Vidala Onion Dressing
1/3 cup raisens/cranberries and nut mix
1/4 cup bacon bits
2 dashes of ground mustard
salt and pepper


I love this slaw mix. This is shredded broccoli, carronts and cabbage. There are other versions of this (just broccoli and/or broccoli and carrots mix). It doesn't matter what kind you get. It's a matter of preference. 

Put about half of the dressing in a large bowl and add the bag of broccoli slaw. I do this because you want to make sure the veggies on the bottom of the bowl will be covered.  Toss in the rest of the dressing and mix well.  I used tongs to flip it around to mix. Because the veggie mix is shredded, this worked better and was more manageable than using spoon.


Toss in the nuts and bacon.  I used this cranberry nut mix that I got on sale at Big Lots but you could use any mix.  And if you don't like nuts, you can just use cranberries or raisens.  I finished it off with just a few dashes of dried mustard.  I like the bite that dried mustard brings to this recipe. NOTE: If you don't have dried mustard, DO NOT use regular mustard. It just isn't the same! Add salt and pepper to taste.

I like to let the finished mix sit in the refrigerator for a few hours to let the flavors blend together.


You can add more or less of any of these ingredients to suit your taste. The salad throws together in a few minutes and I love it!  It's become my latest food obsession and I make a new batch of it every few days.  Try it, I think you will like it.


Monday, March 26, 2012

Day of the Dead Sugar Skulls Craft A Week #27

I think religious iconography is fascinating. I love how different cultures interpret and convey their religious beliefs. I grew up in Southern California and, while I was not raised Catholic, I have a strong appreciation for Catholic artistic interpretation of religious symbols. I've always thought that Sugar Skulls for the Day of the Dead are particularly cool.

If you aren't familar with the Day of the Dead, it is a National Mexican holiday that takes place on November 1-2. The holiday focuses on praying for and remembering friends and family members who have died. For more information on Day of the Dead, please go to Mexican Sugar Skull.

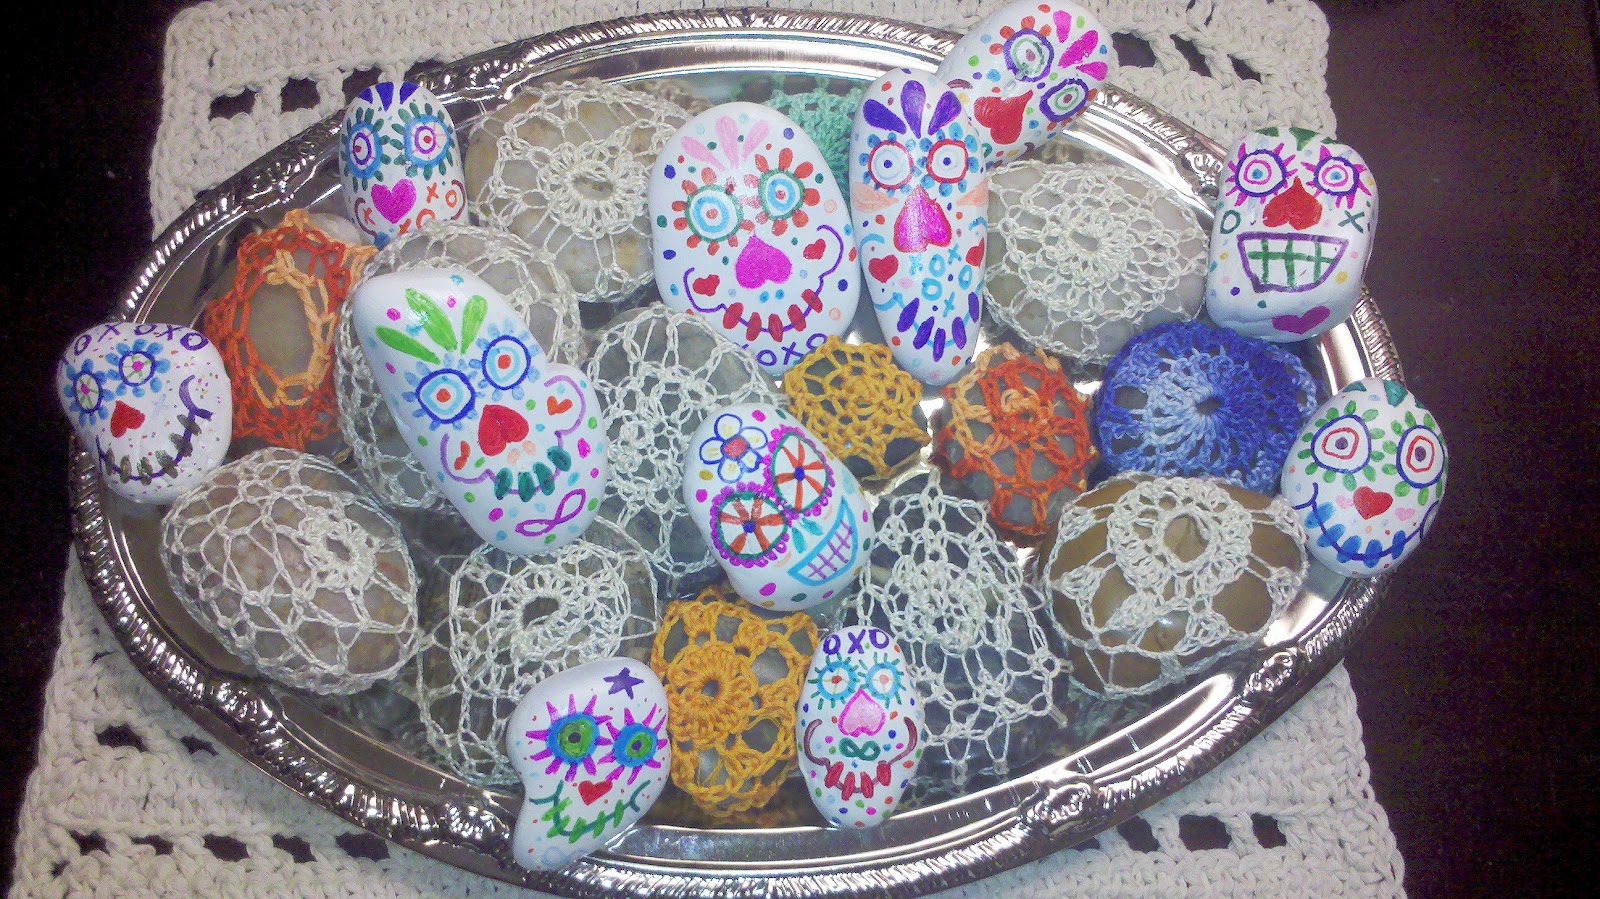
One of the traditions that occurs during Day of the Dead is honoring lost loved ones with Sugar Skulls. These are supposed to represent those who have passed.  While they are traditionally made from sugar (hence the name Sugar Skulls), I made some out of painted rocks. I think they will make nice worry stones.  What do you think?


This is a picture of my Sugar Skull and crocheted rocks. It's getting a little crowded on here; think it's time to do some gifting. (Cydnee, which is your favorite?)

Happy Crafting!

Craft A Week #26 Owl Will Always Love You Crochet Blanket

Pinned ImageSeveral weeks ago I found a post on Pinterest of some really cute crocheted baby blankets that have a stuffed animal head attached.  In my family, we call these "woobies". A woobie is like a favored blanket or snuggly toy.  Here's the picture I found. Aren't they cute?!

I so loved the idea, but when I clicked on the link, the pattern was written in Swedish. I tried Google translate but the terms didn't really translate completely so I was creative in my creation. (If you are interested, the original posting can be found here:  http://brittasami.blogspot.se/search/label/Snuttefiltar%20%28gratis%29.

I thought they were all cute but I decided to try my hand at the Owl - and gave him the title of "Owl Will Always Love You". Here's how Owly came out:

Isn't he sweet?  I like how his wings look like little hands.

Since he was a pilot project, I used the yarn I had on hand. It is all acrylic yarn (not my favorite but easy to work with). The varigated is some vintage yarn that Shana got me a few years ago. (See, I knew I kept it for a reason). 

I tried to follow the directions for the owl head, which I was able to loosely comprehend. I did so much modification though that I wasn't able to write down all the changes I made. I was a little frustrated but then had an epiphony!

It occured to me that all I had done was make a large granny square and put a stuffed animal head onto it.  I then realized that I could make a woobie of any kind....all I have to do is find a cute animal head and put on a blanket. See what I mean?


The next one I make, I will write up the pattern. But seriously, you can make a woobie of any kind based on what animal you like. I trolled Crochet Pattern Central and found lots of possibilities.  I want to make my new grandson Marcus Robert a sleeping kitty in honor of our family cat Bailey. 

UPDATE 3/28/12: Owlie is now posted on my etsy store for purchase. Check back often because I'm making a series of these woobies.
Happy Crafting!

Friday, March 16, 2012

Craft A Week #25 Charm Necklace

I am very blessed with having 7 grandkids (the 8th is due any day now).  Here's a picture of some of them, along with my neighbor Molly. Aren't they cute?!


The kids know that I love jewelry. They are all so thoughtful and have given me lots of kid picked jewelry through the years.  I so enjoy wearing the special pieces they've sought out for me.  Here's some of the beautiful treasures they've given me for various occasions.

I love all these pieces but found it was hard for me to wear them all very often.  Not wanting to play favorites and have it seem like I prefer one piece over another, I decided to figure out a way to combine them.  (There's also a charm that Breanna gave me, as well as wish box charm that I love).

As you can see, I have a mix of things: Hearts, friendship charms, vampire protectors (crosses), a bear, and some other various items. After much thought, I combined them into the following.


I LOVE how this came out! Now I have components of 8 separate pieces of jewelry that I can wear at the same time. I also love the eclectic nature of this piece and how I was able to recycle all this into another piece. For some reason this picture makes it look more gold than silver but that is not the case. These pieces are all silver in color.  Isn't it cute?  This may be my new favorite piece.

I spruced the piece up with a good scrubbing of toothpaste.  You know that trick, right?  Any kind of toothpaste works as a jewelry cleaner.  Just squirt toothpaste in your hands, rub them together, and rub that into the jewelry. I also take a toothbrush and give a good scrub. Then rinse well and your jewelry is now bright and shiny.

Happy Crafting!


Wednesday, March 14, 2012

Versatile Blogger Award


How awesome is it that I just received the Versatile Blogger Award!  I feel so honored for the recognition and acknowledgement.  Thanks so much to Robin Hartman of Snips and Snails for giving me the award. 
 
Pay It Forward; this is how it works:
  • Thank the person that nominated you, and give a shout out to them on your blog with a link to theirs.
  • Share 7 random facts about yourself.
  • Send the blog award to 15 other bloggers whose blogs you love and appreciate, and let them know they won the award.

7 Random Facts About Me:

  • I have a 3 legged dog named Marcella.
  • Will and Grace always makes me laugh.
  • I spend way too much time on Pinterest.
  • My motto is live, love, laugh, and learn. (Most people leave off the learn part).
  • My mom is one of my very best friends.
  • I have a new grandson due to arrive any day now (welcome Marcus Robert)!
  • I've been "green" since the concept was first around in the 1970's.

The following are the blogs that I'd like to receive the Versatile Blogger Award. These are some of my favorites. Check them out; I'm sure you will agree.
 
Repeat Crafter Me
Alli Crafts
I'm Topsy Turvy
The Purl Bee
Flax and Twine
Can't Stop Making Things
Maiden D'Shade
Craft Gossip
Saved By Love Creations
The Painted Hive
A Dog In a Sweater
Polish The Stars
Six Sisters Stuff
A Little Glass Box
Empress of Dirt

Monday, March 12, 2012

States I Have Been Website

I found this site on Pinterest and wanted to share. I know not everyone is on Pinterest so I thought I'd I wanted to post here as well. It's real simple: Check off the states you've visited and it creates a map for you.  I thought I was relatively well traveled but by the looks at my map, I'd better get out there more. Here's my map.

Seriously, I'm missing so much of the U.S.! I have driven through some of the southern states on my two cross country trips but I don't really consider that I visited them.....driving through doesn't seem like visiting to me. I'm thinking I should plan a road trip!

You can create your own map by clicking this link:  Visited States Map.  How about you; are you as well traveled as you thought?


Sunday, March 11, 2012

Craft A Week #25 Crocheted Monster Hats

One of the beauties of having small children in your life is the ability to dress them up in fun ways. You only have a short window of time to influence their clothing choices and I take great delight in playing with that. (David Sedaris, in Dress Your Family in Corduroy and Denim writes a very funny story about how they dressed up his little brother when he was an infant. If you aren't familar with David's work, I highly recommend you exploring it. I listen to his books on cd while driving - guaranteed to make me laugh out loud).

I had a request from Breanna, my youngest, to make this hat for her yet to be created babies. (Bre is 23, not married, not pregnant, and not planning it anytime soon). She just loveed this hat and wanted one to tuck away for future use. I must admit, they are really cute and funny.  It was easy to fill her request.

This is the toddler hat without flaps. Isn't it cute?!

I think this red and brown hat will be the perfect compliment to the red Ugg-like slippers I made last week. This hat is said to fit a 9-12 month old.

I found this idea on Pinterest (of course).  The link for all the instructions can be found at Repeat Crafter Me. I took Sarah's advice and used the basic ear flap hat instructions located on Alli Crafts. This pattern is really straightforward and works up quick.


This is my favorite. I love the brown and green combo. Reminds me of a chocolate mint cookie (monster).  Bre says these hats remind her of the one eyed monster from Monsters, Inc.

In absence of any little people, I enlisted Pooh Bear to be a model.  These hats are so cute and simple to make. They are a great way to use up stash yarn.  Another Super Simple craft!


UPDATE:  Here's the monster hat on a real live (and adorable baby). Thanks little man for being my hat model!  I plan to post these on my etsy shop later this week. I haven't had time to create the write up.


Update: Here's more cuteness for your day....puppy in a hat! Isn't she adorable?  This is a puppy, named Penelope, that my daughter Breanna is fostering. Bre works at an animal rescue organization and fosters puppies til they are ready to be adopted. Such a great cause.


Happy Crafting!


Friday, March 9, 2012

My Etsy Shop is Finally Open For Business!

Clearly I've been on a crafting mission as of late. Part of my motivation is that I just love to do crafts; it really is how I express myself. Some people write, other people paint.  Me, I craft. If you've read and followed this blog, you know I've created alot of things. While I am sure my friends and family LOVE receiving my home made goodness, there's a limit.  (Seriously, how many hand crocheted animals can one kid have)?

Thanks to the wonderful encouragement I've received from friends, I decided to open my own Etsy shop. I only have a few things listed right now but there will be more to come. If you (or anyone else you know) wants me to make something particular, please let me know. You know I'm happy to do custom orders.

Here's the link to my shop:  Ant Bea Etsy Shop.  Come visit my shop!

Thursday, March 8, 2012

Craft A Week #24 More Crocheted Rocks

A few weeks ago I posted some rocks that I crocheted "little sweaters" for. Those were done with a natural crochet cotton and have a delicate, lace-like look to them.

I wondered what kind of look the stones would attain if they were crocheted with colored, variegated embroidery floss. Here's how they came out:


Pretty, aren't they?


They remind me a little of Easter eggs.

I didn't use a pattern; I just free handed. Some are more detailed than others, and I like that look.

Happy Crafting!