Pinterest

Follow Me on Pinterest

Thursday, September 29, 2011

Popcorn Recipe Book

In Sunday's paper there was an ad for The Popcorn Factory. We don't have a retailer here (I only remember one years ago at the Glendale Galleria). I thought about sending a tin of popcorn to the grandkids for a gift. When I looked on the site, I found their prices are pretty high ($39.99 + $9 for shipping).


A quick search online led me to the Popcorn.org website. It seems to be the definative site for all things popcorn!  They provide a free pdf popcorn recipe book, found here: Popcorn Recipes.  Who knew you could do so many things with popcorn?! Some of them seem a little out there (creme brulee with popcorn topping; popcorn and mushroom crusted tilapia; coconut popcorn crunch pie) but others sound yummy (caramel almond popcorn clusters; bacon and cheese popcorn; easy carmel corn).

Later I'm going to try the Cinnamon Sugar Kettle Corn. (I'll post pictures and details).  I also think I will make Timothy some Brown Sugar Lollipops for his birthday.

Sunday, September 25, 2011

Freebies, Coupons, and Coupon Code Websites


I LOVE to get stuff for free! I troll sites for free samples because I like trying out new products. I get samples that I use for my travel bag (shampoo, conditioner, tooth paste, body wash) or I use to stock a basket of supplies in my guest room.  There's alot of places on the internet that list these but here's a few of my favorites:

Wal Mart Free Samples: These change pretty often so check back frequently.
Buxr Freebies: This is a great site! They not only have lots of freebies but also have fantastic deals (under the coupons tab).
Absurdly Cool: Lists lots of freebies and good deals.


I NEVER pay full price when I buy online!  There are so many sites that list coupons and codes. Here's some of my favorites:

Deal News: I look under the "Editor's Choice" tab. They too list freebies but also coupon codes and fantastic sales. I found the code on here for my Droid that enabled me to get it for free when the Verizon site was charging $200 for it!
Pinching Your Pennies: This site offers some freebie links too but lists alot of sales and coupon codes.
Crazy About Deals: Another site that lists freebies, coupons and sales.
Mommy Saves Big: More freebies, coupons and sales.
Coupon Dork: First, love the name!  This site starts with a pull down menu that you select the store you are looking for (for example, Target) and it lists coupons and free shipping codes.
Just Rebates: A big list of current rebate offers.
All You: The magazine All You lists a wide array of coupons and free samples.
Coupon Cravings: Does what it says! Coupons!
Retail Me Not: Coupons and codes. This is definately one of my "go to" sites when I find something I want online. They usually have a code that enables discounts and/or free shipping.


Finally, Ebates!  Before I buy anything online, I check to see if they participate with Ebates. To use, set up an account with Ebates (for free: use my awanadalla@verizon.net as a referral and I get $5 credit for referring you). Then look for the online store you want to place your order. Click on the store and you will be transferred there through Ebates. Each store has a varying ebate (between 2% for Walmart, up to 26% for Magazines.com). Ebates will then send you a quarterly check for your rebates.  It my not seem like alot but it adds up. I've received $240 in rebates since I joined the site in 2008: Not going to get rich off it but it's still money!

I find Ebates the best for magazines subscriptions. Especially during the holidays, magazines go on sale. The sale, along with the rebate, allows me to get some great deals on magazines (like Cosmo for $9.00 a year subscription). Great gifts!

I know Shana has some favorite freebie and coupon sites as well. Shana, please feel free to share your links in the comments.

Happy Savings Time!

Crockpot Macaroni and Cheese

I've made crockpot mac and cheese for so long that I don't have a written recipe. But as per Jenn's request, here it is!

  • 1 box of macaroni (elbow, rontoni, riggatoni: whatever you like)
  • 12ounces of grated sharp cheese (1.5 blocks). While I prefer sharp or extra sharp, I will use whatever I have on hand.
  • 4 ounces of cream cheese, cut into cubes
  • 1 t powdered mustard (if you have it. If not, you can make without. I just like the little bit of spiceness this gives).
  • 1 t salt
  • 1/2 t pepper
  • 4 T butter or margerine
  • 20 ounces of milk (or more)

Cook the noodles as instructed on the box - except cook for 2 minutes less. This helps so the cooked mac and cheese isn't major mushy.  Dump into greased crock pot. Turn on low.

Add all ingredients, except milk, and mix.  Once that is done, pour in enough milk to bring to the top of the noodles and cheese. Stir a little, cover, and let it cook.

Check this in two hours.  Stir and add more milk as needed. You will want to keep the milk pretty high early on. As it cooks, the noodles absorb the milk and it thickens up. Once it starts to thicken up, check back every hour or so to make sure it isn't getting mushy or dried out.

The time needed for this really depends on your crockpot. In some of my crockpots (I have 5!) it takes 4 hours; in others it takes more like 6. 

Yummy, yummy!  Enjoy this Jenn and let me know how it comes out for you.

Homemade Canned Salsa Recipe

Yesterday I stopped by my favorite farmer's market Oak Grove Farms. If you haven't been, it is located off Williams Grove Road in Mechanicsburg. They have amazing produce: All locally grown and incredibly fresh. Their prices aren't much higher than the regular grocery store and you can't beat the taste!

At this time of year they always have boxes of "seconds": Fruits and veggies that need to be used up in short order before they go bad. I always get tomatoes there for canning. Yesterday I got a big box of tomatoes and peppers for only $8.50!


I loved the mix of tomatoes and peppers.  So many flavors! (I still have 1/4 box of roma tomatoes and a gallon bag of peppers, even after making all this salsa)!

Here's the recipe:

  • Tomatoes- 20 cups peeled, cored, chopped tomatoes, which takes about about 8 lbs (yes, quite a few - you remove the skins, seeds and a lot of the water, so it takes a lot to start.)
  • 6 cups seeded, chopped chile peppers (about 2 lbs worth - less if you want a milder salsa)
  • 1/2 cup seeded, chopped jalapeno peppers
  • 5 cups chopped red onions (I used 4: didn't really measure them)
  • 1 head of garlic, finely chopped
  • 1.5 cups cider vinegar or lemon juice
  • 1 tablespoon oregano leaves
  • 1/2 cup fresh cilantro*
  • 1 1/2 teaspoons salt
  • 1 t chili powder
  • 1 18 oz can of tomato paste


  • Remove tomatoe skins by dropping cored tomatoes into boiling water. Let them in the water for 3-4 minutes then scoop out and drop into ice water. This process allows you to remove the skins quickly and easily.

    Once the tomatoes are skinned, squeeze out the seeds and liquidy insides.  Because I wanted to can this salsa, this step is important. If you don't remove the liquid, the end result of the salsa will be really watery. Chop up the tomatoes and dump into a big enamel pot, turned on medium heat.

    I then chopped up the peppers, onion, garlic, and cilantro in the food processer, which I added to the tomatoes. Add the spices as well. By this time, the mixture was starting to heat up and there was some liqued in the bottom of the pot. I scooped out about a cup or so and put in the food processor along with the tomatoe past. I whipped this up (just so it would be well blended) and put back into the tomato mixture.

    I add the tomato paste because it helps make the salsa thicker. When you heat the salsa during the canning process, it draws the water out of the tomatoes. Eventhough you think you got alot of water out of the tomatoes, they still have a high water content.

    I let this mixture cook on the stove for about 10 minutes. You don't need to cook this all that long as the canning process will do that for you.  (Once I got all the ingredients into the salsa pot, I filled up my canning pot and set the water to boil. While that was happening, I filled my clean, sanitized jars with the salsa mixture). This recipe made 12 pint jars of salsa.

    Put the filled jars into the boiling water and cook for 20 minutes. Remove the sealed jars and allow to cool on the counter. Viola! Enough salsa to last through the spring!


    If you want information on canning, Pick Your Own is one of my favorite sites. They have recipes and canning details, as well as links to local places where you can pick your own produce. 

    Crockpot Applesauce

    I was a total domestic goddess today!  Yesterday we went to Breanna's new house (looks amazing! They've done so much and it looks wonderful). Her house butts up against an apple orchard so we picked some apples. I came home with a nice big bag of apples.


    As you know, I make most anything in the crockpot. I use the slow cooker for multiple reasons. One is because I like to make things in stages. Using the crockpot enables me to do the prep and cooking first, and clean up later. Second, I love the wonderful sweet smells the come from cooking something for hours. This recipe filled my house with lovely aromas of apples and spices for most of the day; who needs a smelly candle when you can get these scents naturally?!

    Here's my recipe:

    • 10 apples (cored, peeled, and cut into pieces. Mine were about 1" but I wasn't precise)
    • 2 t pumpkin pie spice (you can use cinnamon if you want but I like the mix of flavors with pumpkin pie spice)
    • 1 t vanilla
    • 1/2 c brown sugar
    • 1/2 c water
    Dump the apples in the crock pot, add the other ingredients and mix well to coat. Set crock pot on low and cook for 6-8 hours. 


    That's it!  Super simple.  I like my applesauce chunky so I don't mash it up. If you like smoother applesauce, mix the cooked applesauce with an immersion blender or stick in the food processer.

    This recipe made a quart (which I canned) and about 2 additional cups (which I put in the fridge to eat this week). Try the recipe and let me know how much you love it!


    Yummy!


    Tuesday, September 20, 2011

    Random Bits of Goodness Angel Mirror

    I was so excited and inspired by the original Random Bits of Goodness Mirror that I made another!  For the past few years I've been collecting religious icons, not really sure what I wanted to do with them. I really wanted to create a picture that had representation of many world religions, but I was very heavy on Christianity (including 4 strings of rosary beads - and I'm not even Catholic). Given that, I decided to make this one with crosses, angels, and other Christian artifacts.  I love it!

    I love this little cherub. It's actually ceramic.


    I picked up this tiny bible somewhere....I wanted to include it but couldn't "bronze" it. So for now, it's just sitting atop the frame.  I may try to attach it somehow.


    Another corner with angels and crosses.


    Here's the two frames hanging on my wall. 


    Invest in a Girl, Save the World

    The Girl Effect is a project that focuses on investing in girls to stop the cycle of poverty. Some of the facts from their website include:
    •  When a girl in the developing world receives seven or more years of education, she marries four years later and has 2.2 fewer children.
    • An extra year of primary school boosts girls’ eventual wages by 10 to 20 percent. An extra year of secondary school: 15 to 25 percent.
    • Research in developing countries has shown a consistent relationship between better infant and child health and higher levels of schooling among mothers.
    • When women and girls earn income, they reinvest 90 percent of it into their families, as compared to only 30 to 40 percent for a man.
    • Approximately one-quarter of girls in developing countries are not in school.
    • Out of the world’s 130 million out-of-school youth, 70 percent are girls.
    While their focus is on girls on a global level, I contend that we need to use the same principles nationally. We have a large portion of our girls who live in poverty. Girls in poverty, regardless of where they live, are at risk of repeating the cycle of poverty.

    Invest in a Girl, Save the World.

    Saturday, September 17, 2011

    Random Bits of Goodness Mirror

    Those who know me understand that I truly enjoy kids, toys, and crafts. I love my grandchildren (and their friends, and my neighbor's kids). Our family has six children between the ages of 3 and 9 (and another sweet little baby joining us in March 2012). 

    Five of our six children are within 2 years of each other so they've gone through the same developmental cycles around the same time. That means I've got alot of little plastic toys all over my house! Now that the most of the kids have outgrown them, I was on the lookout for something to do with all the residual playthings. (Obviously, I wasn't about to just toss the stuff out).  I came upon this very cool project!

    The good people at the website "Can't Stop Making Things" (don't you love that name?!) gave me a solution. They call it a Faux Metal Mirror. I call it Random Bits of Goodness! I love all the little chachke that comes with little kids. This project gave me a great way to recycle, save and display toys that would otherwise have been thrown away.

    It's a proces, so bear with me!

    Supplies:

    • Artist Canvas (mine is 16" x 20")
    • Mirror tile (mine is 12" x 12")
    • Lots of discarded plastic toys, or anything in your junk drawer (mine took alot. I knew there was a reason I saved all those KinderEgg toys)!
    • Liquid Nails glue
    • Spray paint for plastic (I bought pink because it was on sale at Ollie's for .99)
    • Primer spray paint (I used rust color)
    • Copper Metal & Patina Glaze by Valspar
    • Antiquing Glaze by Valspar
    • Clear spray

    Tools
    • Masking tape
    • Paint brush
    • Clean cloth (to apply the Antiquing Glaze)

    Note: "Can's Stop Making Things" said to use Copper Topper but I couldn't find it locally so I substituted the Valspar products.


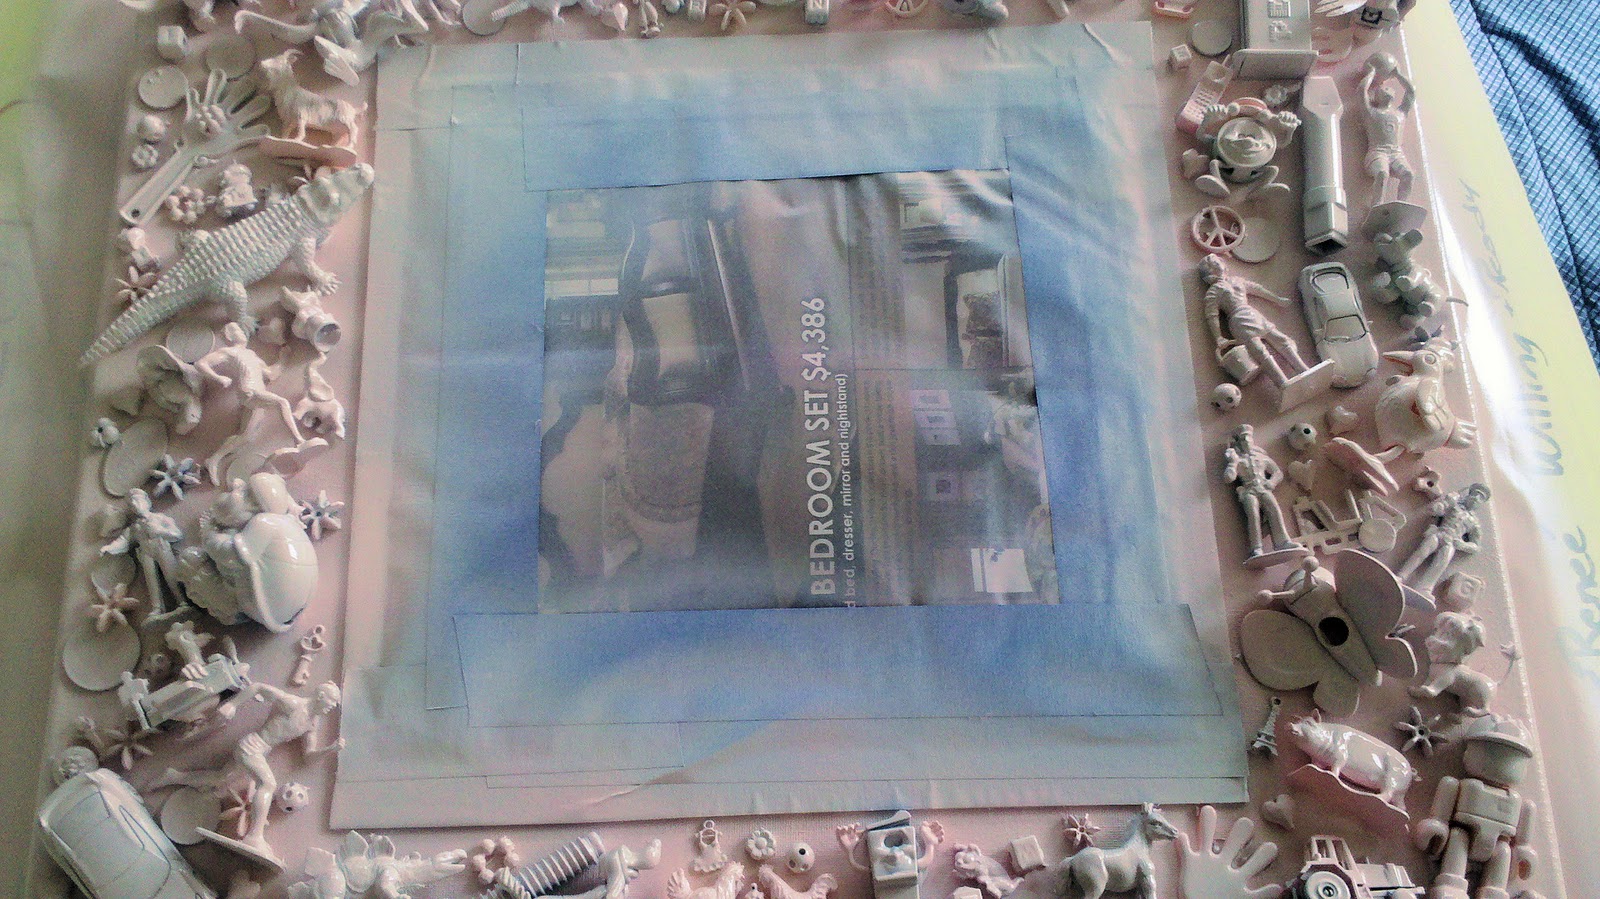
    This is what I started with. I centered and glued the mirror onto the canvas.


    Glue all the goodies onto the canvas, around the mirror.


    Here's a close up. This was a process for me. I put things where I thought I wanted them but let it sit overnight before glueing in place. I'm glad I did because I changed some things. When you are satisfied with your placement, glue them into place.


    Tape off the mirror. Spray paint with a paint made for plastic. The color doesn't matter. (Mine was pink). This coat is just so the true base coat will adhere appropriately. Apparently it will stick better if all pieces are covered in the plastic paint. I used several light coats to make sure everything was covered without dripping.


    Allow to completely dry. Once that is done, spray with the rust primer.  Again, use light coats but make sure to completely cover all sides of the objects with the paint.


    The Valspar product says to allow the base coat to dry at least 4 hours before using. This was a total test of patience for me as I really wanted to see the completed project!

    
    The next step was to apply the copper glaze. I put two coats on, allowing the first coat to dry before applying the second. While the second coat is still wet, I applied the antiqueing glaze. I let it dry overnight and then sprayed with the sealer.


    Viola! My completed project!  I absolutely love how it came out! I don't think the pictures really do it justice. I'm still waiting for the sealer to dry and I will take more pictures later. Looks like metal, right?! I was going to hang this in my spare bedroom but I love it so much I think I will hang in the living room.


    Since this came out so well, I'm going to make another picture. I'm interested in religious iconography and think I shall do one with crosses and angels. Stay tuned!

    Thursday, September 15, 2011

    Interactive Art


    Candy Chang is an interactive artist who installed some very cool projects in New Orleans. While this installation is large and based in a public area, I can also see it on a much smaller scale (maybe 3' x 4'?) on a wall of the deck. It would be a great conversation starter, as well as a wonderful way to get to know your loved ones better.  Very cool!

    Candy Change Interactive Art

    Amazon Trade In Program

    I knew that Amazon had a book buy back program but just realized they will also give you gift cards for used electronics, games, and dvd's as well.   I did just a quick search of some videos I have (that are brand new) and found they offer about $10 each. How great is that! If you are like me, once I'm done watching a video, I am done.

    I am all about saving (and making) money. I think this is definately worth taking a little bit of time to see what you can trade in. Christmas is right around the corner and we will all need some more cash!

    Amazon Trade In Program

    Remodeling and Decorating Ideas

    When you are remodeling and/or decorating, the options can be overwhelming.  The following site is an incredible resource! You can browse by both style and space, which is great. You can save ideas in your Ideabook (online storage). You can also read (or submit your own) questions for decorating suggestions.  Very cool resource!
    houzz.com

    Wednesday, September 14, 2011

    Pat Roberson's Marital Advice

    While I appreciate the stress Alzheimer's puts on the family, I'm not sure how (or why) Mr. Moral Minority, Pat Robertson, can give this kind of marital advice. If you believe that marriage is "til death do us part", how could you possibly council someone to divorce their spouse because they have Alzheimer's?

    Pat Robertsons Marital Advice

    I find it fascinating that someone who professes to being a Christian and "upholding Christian values" would identify this as a solution. Oh the hypocrisy!

    Monday, September 12, 2011

    Amazing Jenga Dog

    The dog in this video is absolutely amazing and so very patient! Clearly, I am a lazy dog owner because it would never dawn on me to even think of expecting my dog to do something like this.


    Considering Marcella found the Tupperware on the counter that held the homemade dog biscuits (and ate 8 of them), I find it hard to believe her capable of this kind of delayed gratification.  It is a pretty neat trick though!


    SkinnyTaste Hot Spinach and Artichoke Dip Recipe

    I know we all love hot spinach and artichoke dip. It tastes great but really packs alot of calories if you make it the traditional way with mayo. I found this recipe from Skinnytaste.com that uses Greek yogurt that is far healthier (and less calories) than the other version.  I really don't like the taste (or texture) of Greek yogurt but this sounds like a tasty substitute. I doubt you will taste the yogurt because all the other flavors will make up for it.  Next time I want the dip, I will try this recipe.

    Skinny Taste Hot Spinach and Artichoke Dip Recipe

    Friday, September 9, 2011

    Spicy Peanut Noodles

    I had some left over pork loin that needed used up so I decided to make these spicy peanut noodles. They were so tasty! 


    Here's the recipe:

    In a pot of boiling salted water, cook the spaghetti until tender. Drain and set aside.

    Sauce:
    • 1 large garlic clove
    • 3/4 cup chunky peanut butter
    • 1/2 cup unseasoned rice vinegar
    • 3 tablespoons plus 1 teaspoon sugar
    • 6 tablespoons soy sauce
    • 1/4 cup water
    • 1 tablespoon toasted sesame oil
    • 2 teaspoons crushed red pepper
    • 1/2  teaspoon ground ginger

    In a blender or food processor, chop the garlic.  Put all other ingredients in blender and puree. Transfer 1/2 cup of the peanut dressing to a bowl and toss with the noodles.

    As I said, I had some leftover pork loin which I chopped into 1” pieces and sautéed along with ½ of a red pepper. I also added some stir fry veggies. I had a bag of them but you can also just make your own with broccoli, water chestnuts and bean pods.  Next time I think I will make my own because there just weren’t a lot of veggies in the bag I got.

    I then plated the noodles with peanut sauce and topped with the pork/veggie mixture. I topped with some more peanut sauce. You can also toss with cilantro, green onions and fresh lime juice (I didn’t have these).

    This was really yummy and made a lot of sauce (8 ounces). I’m wondering if this dressing would can okay.

    Wednesday, September 7, 2011

    Recycled Clothes to Dog Toy

    I have a big back of clothes that I was planning to take to Goodwill, however, I think I will use most of the stuff for this dog toy.


    It is super easy: Just cut old t-shirts into 1" x 20" strips, braid/twist together, and knot at the ends. How simple is that?!  I think I've found Christmast gifts for all my dog family/friends.  If you want to make these yourself, here's the link:  Recycled Dog Toy.  I will post pictures after I get some made.

    UPDATE:

    Here's one of the shirts I started with.  It was one that all 3 of the grandboys wore and have now outgrown.  From this, I followed the directions from the link above: Cut 20 1" x 20" strips.  I then knotted and twisted the strips.


    This is what I got:                                                          Clearly, Marcella loves it!


    While this was good for her (since she's a medium/large dog), I wanted something different for Frank and Beans (because they are small). I adjusted the instructions:  1) Cut 20 1" x 12" strips.   2) Divided those strips into 2 groups of 10.  3) Knotted one end TIGHT and continued to tightly knot the strips. (I thought this would hold together better than just twisting).  4) I also knotted the loose ends so it would stay together better.

    Here's my modified dog toy:


    I think this is perfect for small dogs. It's about 7" long and pretty sturdy.  Now if the rain ever stops I can run my treat box to the post office. Be on the lookout boys for goodies for Ant Bea!

    September 14, 2011 Update: 
    The boys with their toys! Aren't they too cute?!


    Teddy Bear from Recycled Sweater

    I was furthering my time wasting skills today with my unexpected day off (because of flash flooding in the area). I'm looking for projects to make that use recycled materials.  Some of the projects were just dumb (newspaper sandels?! Who are they for, homeless people)?!

    I did find a cute idea to make a teddy bear out of a recycled sweater. I'm thinking velour or chennille would be good. Too bad I don't sew!


    Upcycled Teddy Bear

    Tuesday, September 6, 2011

    Garden Flower Bed

    I was trolling around the internet looking for some inspiration and ideas for craft projects. On one of my new favorite sites, Curbly, I came upon this:


    I think it's kind of cool: A true flowerbed!  Would be great if you had a large yard. This seems more practical if it were made from a single bed. What do you think?

    Here's the link:http://www.curbly.com/diy-maven/posts/11133-a-bed-in-the-garden

    Yummy Fresh Tomatoes!

    Saturday I bought a huge box of Roma tomatoes from my favorite fresh produce stand, Oak Grove Farms. I only like the taste of "real" tomatoes (tomatoes when they are in season and can be bought at farm stands). I don't think the tomatoes that are sold in regular grocery stores taste anything like vine ripened. 

    This time of year I go crazy with tomatoe making....sauce, bruschetta, salsa. I then can it so I can have some tastes of summer through the fall, winter and spring.

    Sunday I made 8 quarts of tomatoe sauce. I don't really use a recipe but I can tell you how I did it this time.

    1.  Blanch the tomatoes in boiling water for a few minutes so they are easier to skin.
    2. In batches, toss the tomatoes in the food processer to chop up.
    3. Put those batches into the crock pot (I used 2 crock pots to make these 8 quarts).
    4. When you are done chopping the tomatoes, toss in garlic, onions, peppers, basil, oregan, sugar, salt and pepper into the food processor.
    5. Divide this up between the 2 crock pots.
    6. I also added 1/2 a large can of tomatoe paste to each of the crock pots. This thickens it up and makes it not watery.
    7. Cook on low for 5-6 hours.
    8. At hour 7, add 1/2 of large can of mushrooms.  (You can use fresh also but they weren't on sale).
    9. Pour into jars and heat pack (I'll write another post on canning at a later date).

    Here's what you get:


    Enough sauce to last me till February!  Yummy Fresh Tomatoes!

    I also made some bruchetta but had to use regular vinegar because I didn't have any balsamic. It tastes okay but not great. I'll wait til I get the right vinegar before I make that to can.

    Dog Treats

    I've had a wonderfully domestic week! Today I cleaned like a fiend....believe me, my house needed it! I love all my Granddogs but am painfully aware of how dirty the house gets when there are so many of them. I even steam cleaned the couch. (Note to self: DO NOT give the dogs rawhide bones...they will eat them on the couch and make a slobbery mess).


    Keeping in my puppy love mode, I also made dog biscuits. I found a basic dog treat recipe (flour, corn meal, egg and oil) and added a can of wet cat food for flavor (it called for wet dog food and I didn't have any). While it did smell kind of funky in my kitchen while they were cooking, the dogs had no problem gobbling them down!


    Here's the treats to send to my sweet God dogs, Frank and Beans:


    Dog Tested, Mother Approved!

    Dana asked if I would post my recipe. I found a basic recipe and modified it. To the best of my recollection, here's what I did:

    2 cup whole wheat flour
    1 cup cornmeal
    1 T dried parsely
    1 egg
    1/2 c chicken boullion
    1 small can wet cat food (I didn't have any wet dog food so I used what I had)
    Additional corn meal as needed.
    Mix flour, corn meal and parsely together.   Mix egg and chicken boullion together. Add the dry mixture to the wet. (It will be really stiff). Once that is mixed, add the cat food.  Add as much corn meal as you need to make a stiff dough that you can handle.


    Make little balls (1 teaspoon) of this mixture. Place on greased cookie sheet. Take a well floured glass (bottom) and smash down the balls. You will do this several times so they are pretty thin (1/4-1/2"). 


    Bake in 400 degree oven for 20 minutes. Flip over and cook another 5-10 minutes till they are dried out.
    I put them in a plastic container. Think they should go in the fridge if you have them longer than a few days.


    Here's a link to alot of other dog treat recipes.

    Home Made Dog Treats

    Monday, September 5, 2011

    Netflix on Droid 2

    This weekend Verizon automatically updated my Droid 2. Initially I was not happy as the update changed alot of cosmetic things and it threw me. (While I love change when I initialize it, it makes me very unhappy when it is thrust upon me). 

    Not knowing what changes were actually made, I decided to explore Android Market and see what apps were available. I noticed the Netflix app so I installed it.

    I am so glad I did! This app streams smoothly (no fits and stops). All my "instant" choices are there for me to choose from.  What a sweet treat to watch a movie on my phone! (I tried running both Netflix and Hulu on my phone when I first got it but they were not supported on the Droid 2 at the time).

    I haven't tried Hulu yet but if you have  Netflix account, I highly recommend seeing if the app is supported on your phone. It's pretty sweet!

    Sunday, September 4, 2011

    Focaccia Bread


    Tonight I made Focaccia Bread. So yummy (and easy). You can buy the dough already mixed at the store but this is so simple to make. You can have it anytime and not have to plan ahead (I like that alot)! Here's the recipe.

    Ingredients

    • 3 1/2 cups all-purpose flour
    • 1 teaspoon white sugar
    • 1 teaspoon salt
    • 1 tablespoon active dry yeast
    • 1 cup water
    • 2 tablespoons vegetable oil
    • 1 egg
    • 3 tablespoons olive oil
    • 1 teaspoon dried rosemary, crushed
    • 1 teaspoon garlic salt or pepper

    Directions

    1. Combine 1 cup flour, sugar, salt, and yeast. Mix well. Heat water and vegetable oil until warm, and add to yeast mixture along with the egg. Blend with an electric mixer at low speed until moistened. Beat for 2 additional minutes. Stir in 1 3/4 cup flour while beating, until dough pulls away from side of bowl.
    2. Knead in 3/4 cup flour on floured surface. Cover dough with a bowl, and let sit for 5 minutes. Place dough on a greased baking sheet. Roll out to 12 inch circle. Cover with greased plastic wrap and a cloth towel. Place in a warm place for 30 minutes.
    3. Uncover dough, and poke holes in it with a spoon handle at 1 inch intervals. Drizzle olive oil on dough, and sprinkle with crushed rosemary.
    4. Bake at 400 degrees F (205 degrees C) for 17 to 27 minutes, until just golden. Remove from baking sheet, and cool on rack.

    Welcome Back!


    As you know, I spent much of my summer in Southern California. Aside from spending wonderful time with my mom, I reconnected with my dearest, sweetest, oldest (in length of time known) friend Denise. She is so wonderful and truly one of my life's gifts.

    Since I've been back home I realize that I post ALOT on Facebook, mainly as a way for Denise to know what's going on in my life. Recently Denise said to me, "I'd love to get a glimpse into that filing cabinet of your brain". As a means to that end, I've decided to bring my blog back to life.

    I also got my creative mojo back so I'm using this blog as a filing cabinet of sorts, where I can post recipes and crafts that I'm doing and/or contemplating. Hope you enjoy!

    Here's D and I at Disneyland, sharing our love with Abe Lincoln. We sure are cute chicks, aren't we?!


    My $2 Picture


    I've been looking for the right picture to hang over my fireplace for almost a year now. I'm REALLY thrifty so it makes my choices rather limited. Yesterday I stopped by a church rummage sale and found this picture. It's nothing spectacular but I loved it for several reasons. First, it's rather large (3.5' x 20"). Second, the colors match my living room colors (sage, rust, red, and off white). You can't really tell from this picture but the frame is gold and sage. Third, it was only $2!

    What I didn't like about the picture is that it's just a print and the colors seemed kind of washed out. So I got a creative idea to spark it up with some acrylic paints I have. This is the after picture:


    I'd still like to add more highlights but I only had toothpicks to work with (!). I figured little was way better than too much! I also need to get some gold leaf to spruce up the frame. I think it came out pretty nice for the first draft. I promise to post pictures when I do more to it.